

How To Use the Sunny 16 Rule for Film Photography.

Last Updated

Powered by Creative Commons.
Photo attribution available here.
This site contains affiliate links. We may receive a commission for purchases made through these links.
The Sunny 16 Rule is becoming a relic of the past; a tried and true method that has become less and less popular as automatic functions of cameras have become more prominent.
We still think it’s valuable to know how to use the Sunny 16 Rule, and if you’re interested in film photography, it can be especially beneficial.
Consider this your Sunny 16 Rule Cheat Sheet – everything you need to know in one place.


What is the Sunny 16 Rule?
The Sunny 16 Rule is, in the simplest terms, a quick and easy way to nail the exposure on a photo, without the use of a light meter.
If you’re interested in analog photography, many vintage film cameras don’t have a built in light meter, or, they might not function properly.
While carrying a separate, expensive, dedicated light meter will produce the most accurate results, using the simple Sunny 16 Rule is oftentimes perfectly adequate.
The Sunny 16 Rule is as follows: for a good exposure in Sunny conditions, the aperture should be set to f/16, and the shutter speed should be set to the inverse of the film speed (or ISO if you’re shooting digital).
Don’t worry, it’s really not as complicated as it sounds. Let’s look at how to use the rule.
How to Use the Sunny 16 Rule
It may sound confusing, but with a little bit more info and practice (and our cheat sheet), you’ll be able to use the Sunny 16 Rule in no time. Here are the steps to getting a good exposure without a light meter:
1. Assess the Weather Conditions
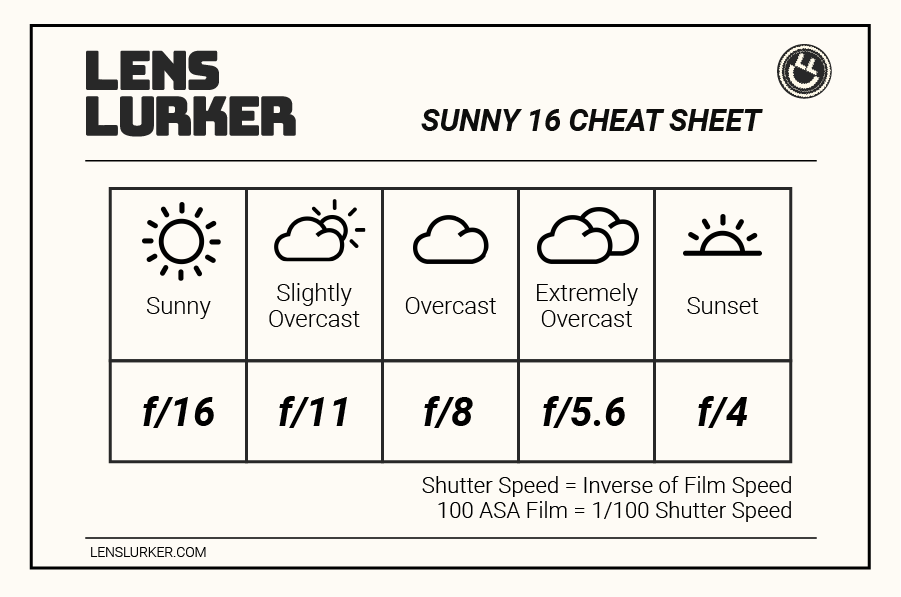
Ok – you’re ready to take a photo. Take a look around. What’s the weather like in your scene? To use the Sunny 16 Rule, choose whichever one of the following five weather conditions is most accurate:
- Sunny
- Slightly Overcast
- Overcast
- Extremely Overcast
- Sunset
There’s no hard and fast definitions about what constitutes “slightly overcast” vs “overcast”, but you get the idea.
2. Set the Aperture (f/ Stop)
Each of those five weather conditions has a corresponding aperture. Set your camera accordingly:
- Sunny = f/16
- Slightly Overcast = f/11
- Overcast = f/8
- Extremely Overcast = f/5.6
- Sunset = f/4
Honestly the most difficult part is remembering which f/ stop goes with which weather condition. That’s why we’ve got a Sunny 16 Chart to make it easier. Check it out here.
3. Set the Shutter Speed
You’re almost done! Seriously!
With the aperture set, next you’ll select the correct shutter speed. All you need to do is check what speed of film you’re shooting (or ISO if you’re using digital) and choose the inverse of that number.
So, if you’re shooting a 400 speed film, let’s say Portra 400, your shutter speed would be 1/400*.
If you’re shooting a 100 speed film, like Ektar 100, your shutter speed would be 1/100*.
And so on, and so forth. See, we told you it wasn’t too difficult!
*We know that 1/400 and 1/100 are not real shutter speeds, we’ll cover this later.

Adjustments to the Sunny 16 Rule
Once you understand the basics, you can start fine tuning the formula to make any adjustments you may need. While the Sunny 16 Rule may be quick and easy, that doesn’t mean you want to shoot every photo at f/16…
The great thing about this method is that aperture and shutter speed both increase and decrease in incremental steps.
So, every time you increase the shutter speed one stop (from 1/250 to 1/500, for example), the camera is letting in half as much light as before. Same goes for decreasing the shutter speed – each stop that you go down doubles the amount of light.
Changing the aperture from f/8 to f/11 also equates to half the amount of light. Moving from f/2.8 to f/2? You guessed it, that equals twice as much light.
Because of the way that both shutter speed and aperture control light, there’s no problem using the Sunny 16 Rule if you want to change one of the settings that the original rule calculated for you.
Changing the Aperture
It seems more likely that you’re going to want to change the aperture of your shot over the shutter speed.
To change the aperture while still following the Sunny 16 Rule, take note of how many stops you are changing the aperture and then adjust the shutter speed the same amount of stops in the opposite direction.
Let’s look at an example:
Let’s say you’re shooting a 100 speed film on a sunny day, with the aperture set to f/16 and the shutter speed at 1/125 (most old film cameras don’t have a 1/100 shutter, so this is the closest shutter speed you can get. More on that here). You want to change the aperture to f/5.6 for a more shallow depth of field, so you need to increase the shutter speed to 1/1000.
How’d we get that?
From f/16 to f/5.6 is three stops (f/16 → f/11 → f/8 → f/5.6).
Add three stops to 1/125, your original shutter speed (1/125 → 1/250 → 1/500 → 1/1000).
Changing the Shutter Speed
The method is more or less the same to change the shutter speed. Here’s an example:
Let’s say the original settings are the same as above: 100 speed film on a sunny day, aperture of f/16, shutter speed of 1/125. Maybe you’re shooting something that’s moving quickly and you want to make sure to avoid any motion blur in your photos.
If you wanted to change the shutter speed to 1/500, you’d need to adjust your aperture to f/8.
Let’s break it down:
From a shutter speed of 1/125 to 1/500, that’s two stops (1/125 → 1/250 → 1/500).
Adjust your original aperture of f/16 two stops to f/8 (f/16 → f/11 → f/8).

When to Use the Sunny 16 Rule
Many professional photographers may not even know how to use the Sunny 16 Rule. That’s because cameras for the last five decades have come standard with built in light meters.
We still think it’s valuable information to learn, and particularly handy in some situations.
When Your Camera Doesn’t Have a Light Meter
Whether you’re shooting a vintage Leica without a built in meter, or your camera’s meter has stopped working, the Sunny 16 may come in handy for you.
Many people prefer a film camera that can operate without batteries, which for many models, exist only to power the light meter.
A dedicated light meter will definitely get you the best results, but they are expensive and not something you’re likely to carry with you all the time.
To Test the Functionality of Your Light Meter
What about when your camera’s starting to seem like it’s on the fritz? If you’re shooting film, you probably don’t want to wait until 36 frames plus the time to develop to see if your meter is working properly.
Instead, use the Sunny 16 Rule to set your camera and then compare that to what the built in meter reads. If they come back relatively close, the meter’s probably fine, if they come back drastically different, your camera’s light meter might be broken.
Sunny 16 Chart (Cheat Sheet)
While following the Sunny 16 Rule is easy, it’s not quite as easy to remember which aperture corresponds with each weather condition. To make sure you’re always prepared, you can download our cheat sheet below and print it out and keep it in your camera bag. (Or, you know, just take a screenshot, because it’s 2023).
Negatives to Using the Sunny 16 Rule
Just like anything else, it’s important to look at the downsides to the Sunny 16 Rule and know when to use a different method.
Settings Don’t Always Exist
This one is particularly important to film photographers. As seen in our example above, sometimes the Sunny 16 Rule equates to settings that don’t exist on your camera. If you’re shooting 100 speed film, there’s no 1/100 shutter speed. There’s no 1/200, 1/400 or 1/800, either.
Luckily, most film stocks have a decent exposure latitude, meaning that you can usually over or under expose a shot by a few stops while still getting a decent image.
Following our example above, if we were shooting 100 speed film, we’d use the 1/125 shutter speed, because it’s the closest to our desired setting of 1/100.
Not the Most Accurate Method
We’ve already mentioned a few times that the Sunny 16 Rule is definitely not the most accurate way to measure your exposure.
For a lot of photos, it will be perfectly adequate, but certain situations will call for a precise metering and a perfect exposure.
Even compared to most cameras’ built in meters, a dedicated light meter is by far the most accurate method. If you regularly shoot a film camera without a meter, it’s probably worth your while to invest in a dedicated light meter.
The Sekonic Flashmate is a tried and true option trusted by many photographers. Check out the Flashmate here.